A cheeseboard is the ultimate for any dinner party, but especially during the festive season, this is the first thing that comes to mind when it’s your turn to entertain. It is impressive to look at, acts as a statement piece for your table, and is a sure fire way to please all your guests. The best part is that it takes minutes to put together once you figure out all the bits, and looks like you’ve put in a lot more effort into it than you actually did!
The basic principle when putting together a cheeseboard to have little bits of salty, sweet, and crunchy, and top it with a few condiments/preserves. The thing about a cheeseboard is that you get lots of little bits of food to nibble on. Pile this stuff on a board of your choice and you’re done! On to the wines.

Here’s a step by step guide to build the best cheese board for any kind of gathering, just in time for your late night cards party. Read on!
STEP 1: BOARD
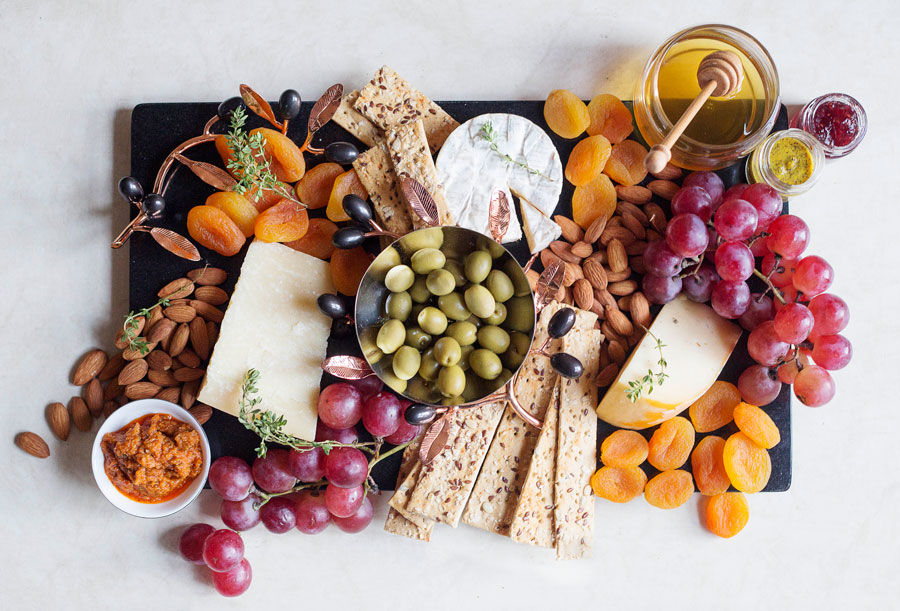
Pick a board. I have this black marbled one that I particularly love for the festive season, but other materials like slate, white marble, or wood work equally well.
STEP 2: CHEESE
It’s always good to have a variety of cheeses in terms of texture, colours and shapes, and even source of milk (cow/sheep/goat’s cheese)! Generally it’s a good estimate to have 2-3 cheeses for a small gathering, and upto 5 for a larger party. I strongly recommend not to use processed cheese for your platter as the cheese really should be the star, and I also like to stay away from pre-sliced or cubed cheeses.
For my cheeseboard, I picked brie which is soft ripened cheese, gouda which is semi-hard, and aged parmesan which is a hard cheese. All three look different as well as have different textures, bringing some variety to the platter.
Arrange your cheeses in a clockwise or anti-clockwise direction, going from soft/fresh cheeses to hard, and place the blue cheese last if using.
STEP 3: SALTY BITS
After the cheese come the salty bits. Think roasted nuts, seeds, olives, pickles, or even charcuterie if you and your guests aren’t vegetarian.
STEP 4: SWEET THINGS
Next come the sweet things. Dried fruits like apricots, dates, and even cranberries are good choices. For fresh fruit, you can use apple slices, pear slices, or grapes. Bunches of grapes are great to fill up any nooks and crannies you have on your board. If you’re using fruits that oxidise quickly, make sure to dip the slices in a saline solution or brush it with lemon juice before your guests come over!
STEP 5: CRUNCHY CRACKERS
This is important, specially when you’re serving a spreadable cheese. Stick to one kind, or have a variety – it’s totally upto you. Pile them where you have empty spaces on the board, and you can always keep restocking if it runs low during the party. I picked whole grain flax seed crackers for my board, which also have a nice salty crunchy topping!
STEP 6: CONDIMENTS, PRESERVES AND OTHER YUMMY STUFF
Now this is totally extra and can be skipped altogether, but such a fun addition. Try honey, truffle honey, fancy jams (fig and raspberry go particularly well), mustard etc. You can also serve chutneys like mango or tomato chutney in small jars. Dips like hummus work too!
And that’s it! It literally takes minutes to throw together once you’ve gathered all the stuff. It’s got something for everyone, and looks so beautiful too!
Watch our video for a 20 second guide to cheeseboard-ing.
We would love to see the cheeseboard you make for your festive party!
Tag @sprigandvine.in on your photos on Facebook and Instagram with the hashtag #goodfoodpractices
Video by Richa Kejriwal for Sprig & Vine. You can check out more of her work here.


Loving the video!!